EPDM Roofing Installation Guide: Expert Steps for 2026
Master EPDM roofing installation with our expert 2026 guide covering planning, materials, step by step methods, advanced sealing, and future innovations for lasting results.
Rising energy costs and unpredictable weather are driving a surge in demand for flat roofing solutions that last. EPDM roofing stands out as the industry’s leading answer, known for exceptional lifespan and performance.
This guide delivers a step-by-step, expert approach to flawless epdm roofing installation, whether you’re covering a commercial facility or a residential home.
You’ll discover planning essentials, smart material selection, proven installation steps, advanced sealing tips, post-installation care, and the latest 2026 innovations. Let’s build your awareness, spark your interest, inspire confidence with expert techniques, and empower you to achieve a successful, long-lasting roof.
Understanding EPDM Roofing: Benefits, System Types, and Suitability
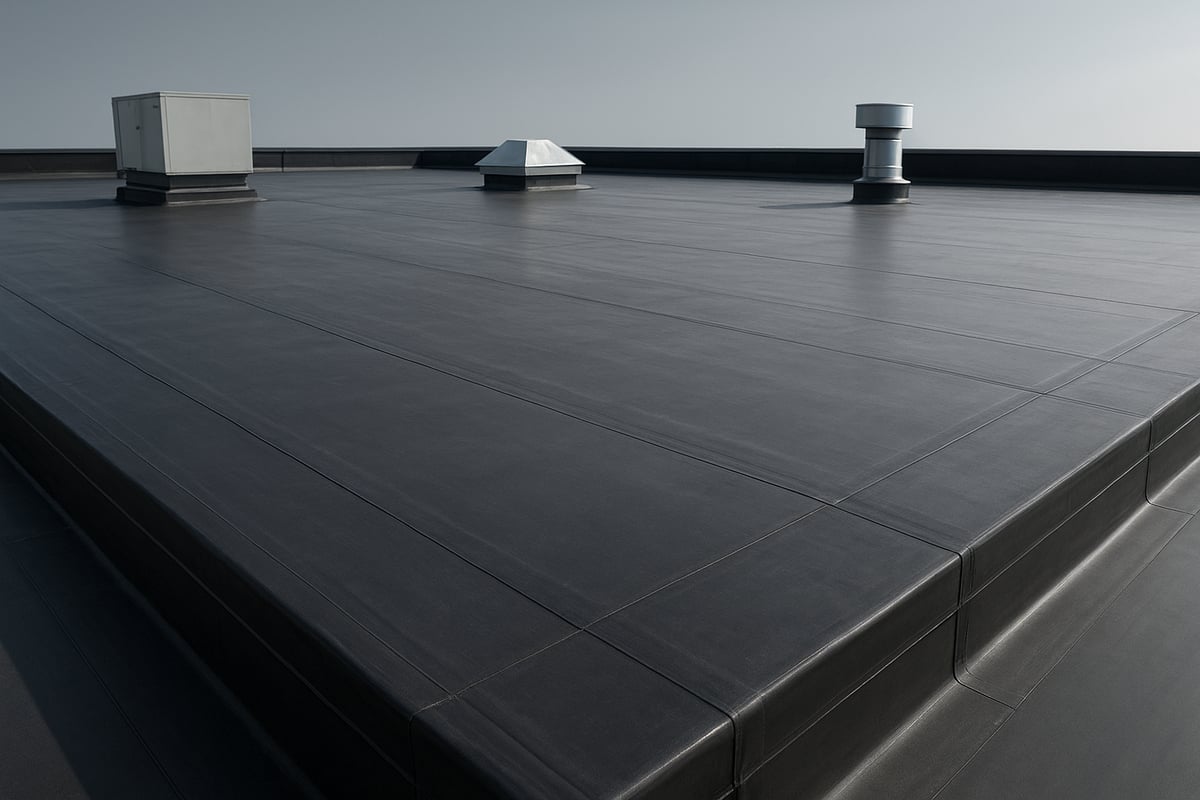
As demand for modern flat roofing grows, understanding the details behind EPDM roofing installation is crucial. EPDM, or Ethylene Propylene Diene Monomer, is a synthetic rubber membrane trusted for decades. With over 200 million square meters installed globally every year, it is a proven choice for both commercial and residential flat or low-slope roofs.
What is EPDM Roofing?
EPDM roofing is a single-ply synthetic rubber membrane designed for flat and low-slope roofs. Its chemical composition ensures resilience in harsh climates. Since its introduction in the 1960s, EPDM has become an industry standard, with millions of square meters installed on commercial warehouses, offices, and homes.
The popularity of EPDM roofing installation stems from its adaptability. It is suitable for both new builds and re-roofing projects, making it a go-to solution for architects and contractors who value long-term performance.
Key Benefits of EPDM Roofing
The advantages of EPDM roofing installation are extensive. This membrane offers a service life of up to 30 years with minimal maintenance. Its resistance to UV rays, ozone, and extreme temperatures keeps interiors protected year-round.
Cost-effectiveness is another major benefit. EPDM is often more affordable than other single-ply systems, while eco-friendly variants support green building goals. For a comprehensive look at features and options, visit the EPDM Roofing System Overview.
EPDM's recyclability and low environmental impact are increasingly important for property owners and facility managers seeking sustainable solutions.
EPDM System Types and Their Use Cases
There are three main EPDM roofing installation systems:
System Type
Weight (lbs/sq.ft.)
Best Use Case
Installation Complexity
Fully Adhered
1.5
Complex shapes, replacements
Moderate
Mechanically Attached
1.3
Large, open roofs, steeper slopes
Moderate
Ballasted
10
New construction, strong decks
Low
Fully adhered systems are lightweight and versatile, ideal for intricate roof layouts. Mechanically attached systems suit a range of building sizes and are effective for roofs with more slope. Ballasted systems, using gravel or pavers, are best for expansive, structurally robust roofs.
Suitability for Different Properties
EPDM roofing installation adapts to a variety of structures. In commercial settings, it is common in healthcare, retail, and government buildings. Residential properties benefit from EPDM's weatherproofing, especially in regions with temperature extremes.
Roofs with heavy foot traffic or rooftop equipment also benefit from reinforced EPDM membranes. Its flexibility and resilience make it an excellent option for both everyday and demanding environments.
Latest Trends and Innovations for 2026
The landscape of epdm roofing installation is rapidly evolving. Enhanced adhesives and sealants are streamlining application and improving longevity. Fleece-backed and reinforced EPDM membranes are gaining traction for their added strength.
Integration with solar panels and green roofing systems is also on the rise, helping properties meet energy efficiency targets. Manufacturers are developing more sustainable, recyclable EPDM products to align with green building initiatives.
Pre-Installation Planning: Site Assessment, Materials, and Safety
Thorough pre-installation planning is essential for a successful epdm roofing installation. Before any membrane is unrolled or adhesive applied, a comprehensive assessment ensures your project starts on solid ground. Preparation at this stage helps prevent costly mistakes and maximizes the lifespan of your new roof.
Site Assessment and Preparation
Begin your epdm roofing installation with a detailed inspection of the roof deck. Remove all old roofing materials, debris, and dust. Check the surface for dryness, smoothness, and structural integrity. Address any damaged sections by repairing or replacing them.
Evaluate drainage by looking for ponding water or signs of previous leaks. Plan for proper slopes to direct water toward drains or scuppers. Accurately measure the roof, factoring in overlaps, penetrations, and any irregular shapes to determine how much membrane is required.
Choose a dry, mild day for installation. The ideal temperature for epdm roofing installation is above 40°F (5°C), which allows adhesives to cure correctly and ensures the membrane remains flexible.
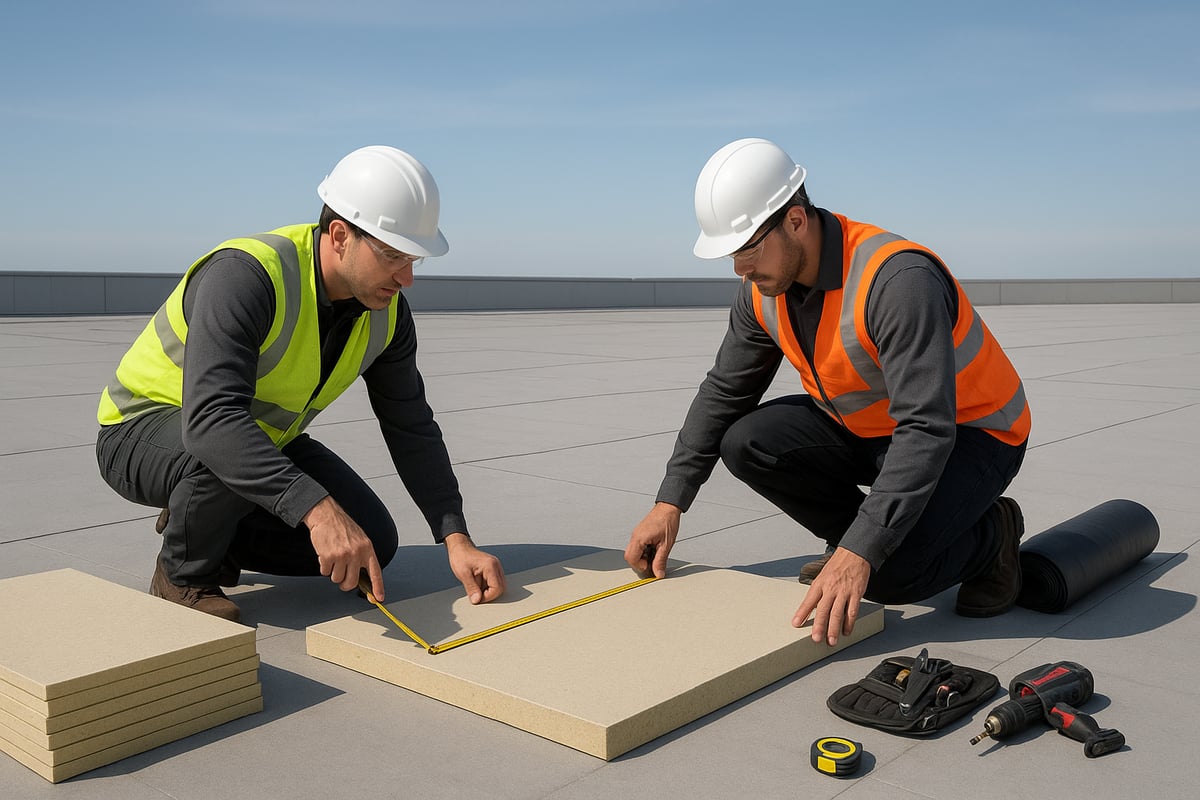
Selecting the Right Materials and Tools
Material selection plays a pivotal role in the performance of your epdm roofing installation. Choose between 0.045" and 0.060" membrane thickness based on desired durability and building needs. Insulation boards improve thermal efficiency and support the membrane.
Select adhesives carefully: water-based adhesives are eco-friendly, while solvent-based options offer faster curing. Essential accessories include seam primer, seam tape, lap sealant, flashing materials, drip edge, and termination bars.
Equip your crew with utility knives, hand or weighted rollers, seam rollers, chalk lines, measuring tapes, and caulking guns. For a detailed comparison of membrane types, see this EPDM vs TPO and PVC Membranes guide, which can help you make an informed decision during your epdm roofing installation.
Safety Protocols and Compliance
Safety is non-negotiable during any epdm roofing installation project. Require all personnel to wear personal protective equipment, such as non-slip shoes, gloves, goggles, and hard hats. Use proper ladder techniques and install fall protection systems, especially on large or elevated roofs.
Ventilation is crucial when working with adhesives, as fumes can be hazardous. Always work in pairs and keep communication open to respond quickly to any incidents. Adhere strictly to local building codes and OSHA standards to ensure every aspect of your epdm roofing installation meets regulatory requirements and best practices.
Step-by-Step EPDM Roofing Installation Process
A flawless epdm roofing installation is the foundation for decades of reliable protection. Whether you are managing a commercial project or upgrading a residential flat roof, following a proven process ensures long-term durability and energy efficiency.
This section offers a detailed, stepwise approach to epdm roofing installation, guiding you through preparation, membrane handling, adhesive application, securement, seam and detail work, final inspection, and essential tips. For further technical depth, you may also consult this EPDM Installation Step-by-Step Guide.
Step 1: Preparing the Roof Deck
Preparation is critical in any epdm roofing installation. Start by removing all existing roofing materials, including old membranes, fasteners, and debris. Inspect the roof deck thoroughly for signs of water damage, rot, or structural weakness. Replace damaged decking to ensure a solid substrate.
Clean and dry the surface meticulously. Even small amounts of dust or moisture can compromise adhesion. Check for standing water and address any drainage issues before proceeding. Install insulation boards and vapor barriers as required, ensuring they are laid flat and securely fastened.
Use chalk lines to mark reference points, helping guide the next stages of the epdm roofing installation. Double-check all measurements against your project plans, factoring in overlaps and penetrations.
Checklist for Roof Deck Preparation:
Remove all old materials and debris.
Inspect and repair decking.
Confirm dryness and cleanliness.
Address drainage and install insulation.
A well-prepared deck is the cornerstone of a successful epdm roofing installation.
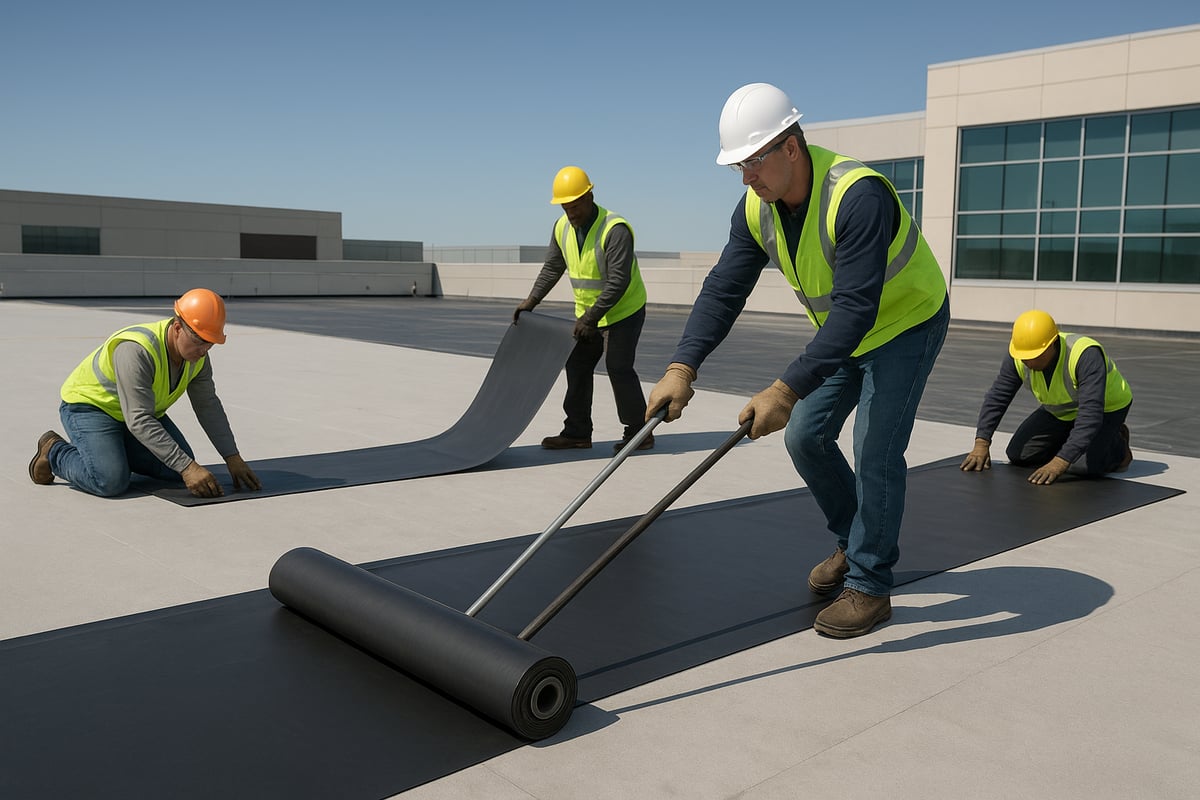
Step 2: Laying Out and Relaxing the Membrane
The next phase in epdm roofing installation is handling the membrane itself. Unroll the EPDM membrane carefully across the prepared deck. Allow it to relax for at least 30 minutes, especially in cooler temperatures, to minimize shrinkage and ensure a smooth fit.
Position the membrane for optimal coverage, minimizing seams and ensuring that overlaps are at least 3 inches wide. Align the membrane with your chalk lines, making necessary adjustments to accommodate roof penetrations such as vents or HVAC units.
Use a measuring tape to verify that the membrane will cover the intended area, with enough material for terminations and detailing. This step is essential for a wrinkle-free, professional epdm roofing installation.
Tips for Laying Out Membrane:
Always relax membrane before adhering.
Plan layout to reduce seams and waste.
Double-check overlaps and edge alignment.
Step 3: Applying Adhesive
Adhesive application is the heart of epdm roofing installation. Select the correct adhesive for your substrate and weather conditions, whether water-based for environmental safety or solvent-based for rapid bonding.
Apply adhesive evenly to both the membrane and the substrate, following manufacturer guidelines. Work in manageable sections to prevent the adhesive from drying prematurely. Avoid puddling, as uneven application can lead to poor adhesion or bubbles.
Use a roller to spread the adhesive and ensure complete contact. Monitor ambient temperature and humidity, as these can affect cure times and bond strength. Consistent technique throughout this stage is vital for a secure epdm roofing installation.
Adhesive Application Table:
Adhesive Type
Best For
Cure Time
Notes
Water-based
Low VOC, eco sites
30-60 min
Needs dry conditions
Solvent-based
Fast, cold weather
10-30 min
Use proper ventilation
Step 4: Installing and Securing the Membrane
With adhesive in place, begin installing the membrane. Roll the membrane carefully onto the substrate, smoothing it from the center out to eliminate wrinkles and air pockets. Use a weighted roller to press the membrane firmly into the adhesive, ensuring complete bonding.
Depending on the system type, you may need to mechanically fasten the membrane or use ballast. For fully adhered systems, pay extra attention to membrane edges and transitions. For mechanically attached or ballasted systems, follow manufacturer specifications for fastener spacing and ballast coverage.
A precise approach at this stage prevents future issues and maximizes the performance of your epdm roofing installation.
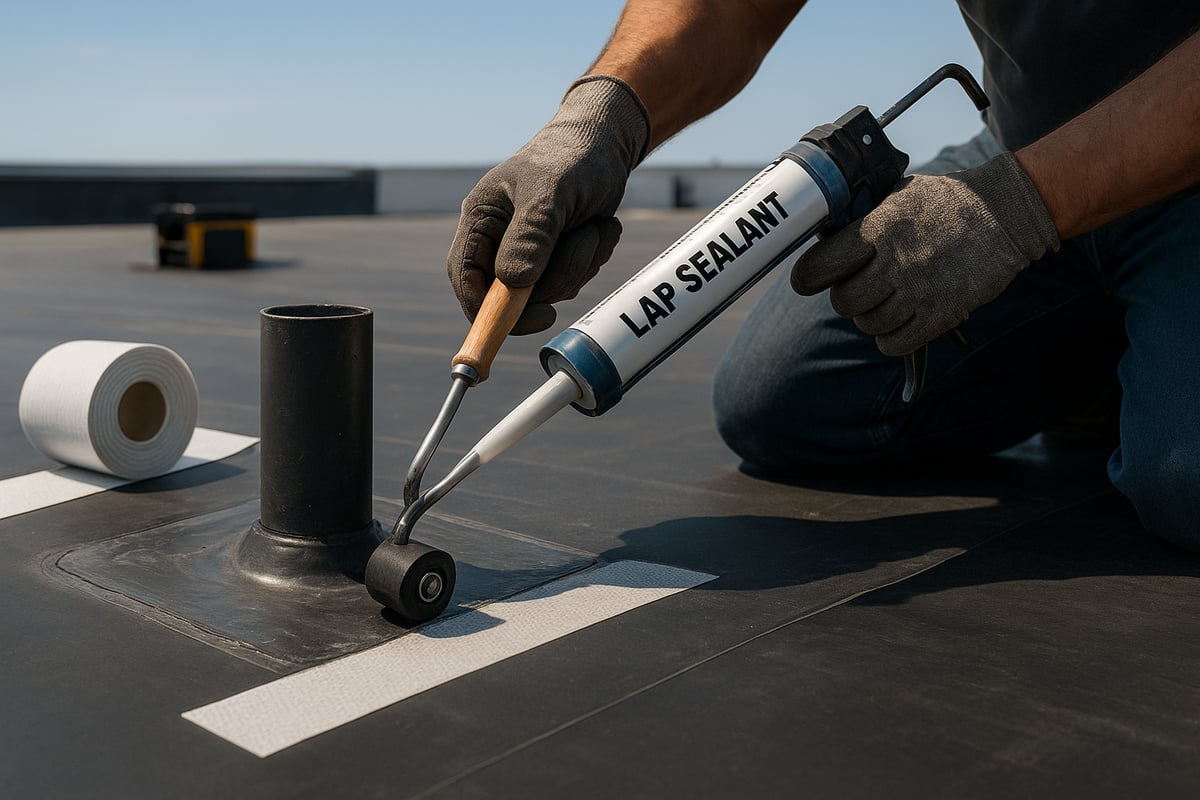
Step 5: Seaming and Detailing
Seaming and detailing are often where epdm roofing installation projects succeed or fail. Clean all seam areas with manufacturer-approved cleaner to remove dust and contaminants. Prime the seam surfaces to promote molecular bonding.
Apply seam tape along overlaps, pressing down firmly with a seam roller. Ensure a continuous, unbroken bond to prevent water ingress. Seal all edges with lap sealant for added protection.
Flash around penetrations using pre-formed boots or uncured flashing tape. Detail corners and roof edges with termination bars and drip edge to prevent uplift and leaks. Thorough seaming and detailing are essential for a watertight epdm roofing installation.
Step 6: Final Inspection and Quality Control
The final stage of epdm roofing installation is inspection and quality assurance. Walk the entire roof, examining all seams, flashings, and terminations for complete adhesion. Look for air bubbles, wrinkles, or missed areas.
Address any deficiencies immediately. If required for warranty, arrange for a manufacturer’s inspection. Document the installation with photos and notes for future reference.
A comprehensive inspection ensures your epdm roofing installation meets both manufacturer and industry standards.
Practical Tips and Common Mistakes to Avoid
Even experienced professionals can make errors during epdm roofing installation. Avoid installing in wet or freezing conditions, as moisture can compromise adhesion. Do not stretch the membrane excessively, as this may cause shrinkage or wrinkles over time.
Common Mistakes Table:
Mistake
Prevention Tip
Installing on a damp surface
Always verify dryness
Insufficient seam overlap
Maintain minimum 3-inch overlap
Poor edge termination
Double-check all flashings
Neglecting safety protocols
Use PPE and proper fall protection
Double-check all seams and flashings before completion. With careful planning and attention to detail, your epdm roofing installation will deliver decades of reliable performance.
Advanced Sealing, Flashing, and Weatherproofing Techniques
Effective sealing, flashing, and weatherproofing are essential for the long-term success of any epdm roofing installation. Even the most durable membranes rely on meticulous detailing to prevent leaks and extend roof lifespan. In this section, we break down the expert techniques that ensure your epdm roofing installation stands up to decades of harsh weather.
Sealing Seams and Penetrations
Seams and penetrations are the most vulnerable points in any epdm roofing installation. Proper sealing begins with a clean, dry surface. Apply a seam primer to both sides of the membrane, allowing it to flash off before placing seam tape. Use a hand roller to ensure strong molecular bonding.
For penetrations like pipes or HVAC supports, shape uncured flashing tape around the base, then seal edges with lap sealant. Always overlap seams by at least three inches. Attention to detail during this step is crucial, as a single missed spot can compromise the entire epdm roofing installation.
Flashing Details for Long-Term Protection
Flashing provides critical defense against water intrusion at roof edges, corners, and transitions. Pre-formed pipe boots simplify detailing around round penetrations, while custom-cut flashing handles irregular shapes and wall transitions. Pressure-sensitive flashing materials offer fast, reliable sealing for complex areas.
Industry leaders have begun to recognize innovative flashing applications through programs like the EPDM Roofing Association’s Inaugural Awards Program, showcasing best practices in epdm roofing installation. Investing in high-quality flashing ensures lasting protection and peace of mind.
Edge Termination and Drainage Solutions
Securing the membrane at roof edges is a vital stage in epdm roofing installation. Termination bars and drip edges prevent wind uplift and water infiltration along perimeters. Ensure these components are fastened tightly and sealed with compatible lap sealant.
Proper drainage integration is equally important. Direct water flow toward internal drains, scuppers, or gutters to prevent ponding. A well-executed edge detail not only extends the service life of your epdm roofing installation but also protects the building envelope from costly damage.
Preventing Common Leak Points
More than 90 percent of EPDM roof failures originate at seams or penetrations. Double-sealing high-risk areas is a proven strategy in epdm roofing installation. Use extra layers of seam tape or lap sealant where needed, especially at T-joints and corners.
Regular inspections are essential. Schedule routine checks after severe weather or mechanical work on the roof. As demonstrated by a Texas commercial building that achieved over 30 years of leak-free service, diligent detailing and maintenance make all the difference in maximizing the return on your epdm roofing installation.
Post-Installation Care, Maintenance, and Warranty Considerations
Proper post-installation care is crucial for maximizing the value and longevity of your epdm roofing installation. By following a structured maintenance plan and understanding warranty requirements, property owners can ensure their roof performs optimally for decades. Let’s break down the essentials for sustaining your investment.
Immediate Post-Installation Steps
After epdm roofing installation, allow all adhesives and sealants to cure undisturbed for at least 24 to 48 hours. Restrict access to the roof during this period to avoid damaging seams or disturbing the membrane.
Remove any leftover debris and tools immediately. Ensure that drainage systems are clear to prevent water from pooling as the roof settles. Document the condition of the roof with photographs for future reference and warranty validation.
Routine Maintenance Guidelines
Ongoing maintenance is key to the long-term success of your epdm roofing installation. Schedule semi-annual inspections, ideally in spring and fall, and always after severe weather events.
During inspections, look for signs of punctures, membrane uplift, or debris accumulation. Clean the surface with a soft broom and mild detergent if needed. Address minor repairs, such as small tears or loose flashing, as soon as they are identified. For detailed repair guidance, consult the EPDM Roofing Repair Guide.
Warranty and Documentation
Most manufacturers require post-epdm roofing installation inspections and documentation to validate warranties. Register your warranty promptly, providing all necessary installation records and photographs.
Maintain a dedicated file for all repair logs, inspection reports, and correspondence with contractors or manufacturers. This organized approach simplifies claims and ensures you meet all conditions for warranty protection.
Maximizing Roof Lifespan, Statistics, and Insights
Investing in a professional maintenance program after epdm roofing installation can extend your roof’s lifespan by 5 to 10 years. Upgrading insulation or adding reflective coatings improves energy efficiency and further protects the membrane.
Industry data shows that EPDM systems require less maintenance than built-up or modified bitumen roofs. For more on durability and real-world performance, see EPDM Roofing Longevity Insights. With proper care, EPDM roofs consistently deliver 30-plus years of reliable service.
EPDM Roofing Innovations and Future Trends for 2026
As the roofing industry evolves, epdm roofing installation is rapidly advancing with new technologies and sustainable practices. Looking ahead to 2026, several key trends are shaping the future of flat roofing systems. These innovations are not only improving durability and performance but also making epdm roofing installation more efficient, eco-friendly, and cost-effective.
New Material Advancements
The future of epdm roofing installation is defined by breakthroughs in membrane technology. Next-generation reinforced EPDM membranes are now available with built-in fleece backings, offering enhanced puncture resistance and dimensional stability. These advancements allow roofs to withstand heavier mechanical loads and minimize the risk of tears.
Manufacturers are also developing EPDM products with improved UV and chemical resistance. This is essential for properties in harsher climates, where traditional membranes might degrade rapidly. With these new materials, epdm roofing installation will deliver longer-lasting protection and lower maintenance needs for both commercial and residential buildings.
Installation Technology
Innovative tools are transforming the accuracy and efficiency of epdm roofing installation. Drones are being used for aerial inspections, providing detailed imagery of roof conditions before and after installation. This technology helps identify problem areas quickly and ensures that every square foot is properly covered.
Infrared imaging has become a standard for quality control, detecting hidden moisture or insulation gaps that could compromise the membrane’s performance. Smart adhesives, featuring color-change indicators, now assist installers by signaling when the adhesive has fully cured. These advances reduce errors and help maintain the highest standards in epdm roofing installation.
Sustainable Roofing Solutions
Sustainability is at the forefront of epdm roofing installation innovation. Modern EPDM systems are increasingly compatible with solar panels and green roofing, supporting energy-efficient building practices. Recyclable EPDM products are gaining momentum, contributing to circular economy initiatives and reducing environmental impact.
Integrating solar and vegetative elements with EPDM not only lowers energy costs but also extends roof lifespan by shielding the membrane from direct sunlight. As building codes emphasize green construction, epdm roofing installation is positioned to be a key contributor to sustainable architecture.
Market Data and Future Outlook
Market projections indicate a continued rise in epdm roofing installation, especially within commercial sectors seeking energy efficiency and durability. Regulatory trends are also accelerating the adoption of high-performance flat roofing systems in new construction and retrofits.
According to the EPDM Roofing Cost Guide 2026, investments in advanced EPDM solutions yield long-term savings due to reduced maintenance and energy consumption. A standout example is a Texas government building that recently adopted a solar-integrated EPDM system, achieving a 20% reduction in energy costs. As the market evolves, epdm roofing installation will remain at the forefront of innovation, delivering resilient solutions for the next generation of buildings.
Full roof replacement in 2026 Demystified Learn expert insights on costs materials process and contractor selection for a durable safe and efficient new roof
Discover expert solutions for leak sealer for roof in 2026 Learn about types application steps innovations costs and maintenance for long lasting protection